Feeds:
Posts
Comments

Posts Tagged ‘tree planting’

Contractors, arborists, and landscape architects in Massachusetts would do well to check out the Ecological Landscaping Association’s September events list.  The ELA is offering a number of really good workshops, on topics ranging from Boston-area restoration projects to the use of fire in landscape management, as well as a two-part, two-day workshop on root issues.  

One day of the root work will focus on soils(f you’ve read any of this blog, or Taking Place In The Trees, you’ll know that I’m interested in roots.)  In the air tool workshop, entitled At The Root: Air Tools Workshop, Rolf Briggs and Matt Foti will be talking about using air to work in the root zone, to decompact soils, to transplant trees and shrubs and also about how to plant nursery-grown stock properly.  

Matt and Rolf have done a similar workshop for the Mass. Arborists Association in the past, and Matt holds an annual workshop on proper planting techniques.  Being able to see what a root system looks like is eye-opening.  Learning — not just from written specs or a generic tree-planting detail — how a tree or shrub should be planted is essential, and well worth the price of admission.  I have been to at least three of these workshops, and learn something new at each one, and so can say that this workshop is one every landscape architect who designs plantings, and every contractor who sells plantings should attend.

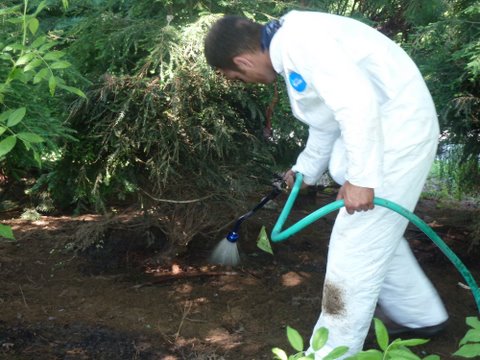
Michael waters in a hemlock whose root flare has been excavated with air.

Read Full Post »

That last post made a good point — sometimes the leftovers in a landscape can be used as a feature in and of itself — but I much prefer the photo here. This hemlock is very much alive, and lives outside of Boston on private property. Carl Cathcart, Consulting Arborist, took me to see this wonderful tree last July, and you can see more photos of and information on the tree at Taking Place in the Trees.

To get an idea of the scale of this tree, look just to the right of the tree's center; Carl Cathcart is standing on the ground under the tree's canopy, and his legs are just visible.

Read Full Post »

It has been a while since I’ve written about root flares. I got some photos from my friend Carl Cathcart the other day, showcasing the excavation of a hemlock root flare. This tree is one of a hedge of 7-8′ tall hemlocks planted two years ago. Its owner had noticed that while the hedge wasn’t failing, it wasn’t exactly thriving, either. He called Carl, a Consulting Arborist, in to inspect the situation.

Carl zeroed in immediately on the base of the tree, and with a little hand excavation discovered that the hemlocks were sitting at least four inches too deep in their root balls. It has been customary for years to plant balled and burlapped trees so that the top of their root balls sits at or slightly above the finish grade around them. Cultivation practices in the growers’ nurseries have changed since that technique became the standard, though, and now it is necessary to check each root ball to make sure that root ball soil is not covering a tree’s root flare. A buried root flare — whether it is buried with root ball soil, compost, or an excess of mulch post-planting — spells trouble for a woody plant, and can be the cause of a tree’s failure to thrive. Small leaves, shorter-than-normal annual twig extension, and thin foliage can all be symptoms of a buried root flare. Root flares are not roots and are not adapted to life under the soil surface; they are part of the tree’s aboveground trunk, and typically need to be exposed to the air.

The in-field solution to this problem (should the excess soil not be removed in the nursery) is to excavate the root flare onsite during project planting. This task should be done before the tree is planted, so that the flare is planted at the correct grade; unfortunately, many contractors are not even aware of the issue, and will not have included time for root excavation in their bid. Here’s where landscape architects can make a major difference in the longevity of their project’s woody plants, and where contractors can distinguish themselves from the competition; LAs aware of the need to excavate root flares should include that requirement in their bid sheets for contractors, and contractors aware of that need (whether they are in a bid situation or not) can use this task, and the benefits it brings to the planted landscape, as a compelling selling point.

When root flare excavation doesn’t take place when the plants go in the ground, the signs of tree stress will likely show up within a year or two. At that point, hand excavation is still possible, but air-tool excavation usually will be more efficient.

When Carl identified the problem, he advised the homeowner to have air-tool excavation done. Matt Foti of Matthew R. Foti Tree and Landscape sent over a crew to carry out the work; Carl’s photos illustrate this post-planting process nicely.
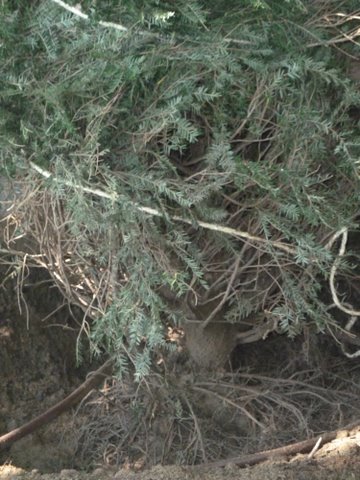
The arborist has tied up the hemlock's branches for easier access in to the root ball. In this photo some of the soil has been blown away already.
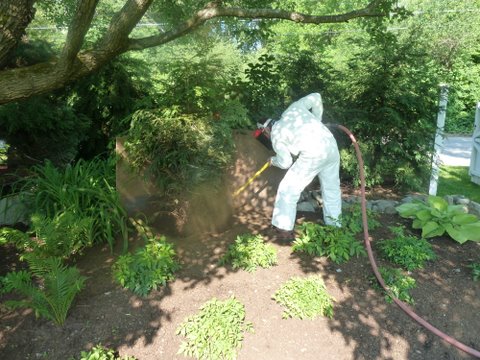

A compressed air tool blows off the root mass. Just visible behind the tree is a plywood barrier that helps keep airborne soil from covering the surrounding plants.

The root flare has been uncovered; note the soil line about four inches up from the root mass. When you see side branches at, just above, or even emerging from below the soil level you can suspect a buried root flare. Carefully scraping away soil at the tree's trunk will indicate if further excavation is necessary. Now that the root flare is exposed, it is possible to see the girdling root that has formed on the trunk's left side.


The girdling root has been cut off, preventing any further vascular constriction in the root coming off the trunk and heading toward the photo's lower left corner.


With the root flare exposed and girdling roots removed, planting soil is blown or shoveled back into the excavated area at the correct grade.
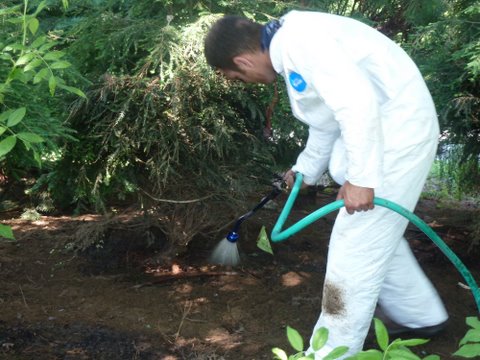

The last step, before untying the branches, is to water the excavated area thoroughly, to rehydrate roots and to eliminate any air pockets in the root mass.

Project site: Private Residence, Sudbury, MA

Consulting Arborist: Carl Cathcart, A Plant Healthcare Consultant
Arborist for root flare excavation: Matthew R. Foti Landscape and Tree Service, Inc.

Read Full Post »
The massive four-stem Norway maple that blew down in high winds last week.

Following up on the list post item from June 9, about what to use to replace a lost Norway maple: it will be a honey locust (Gleditsia triacanthos inermis ‘Shademaster’), placed slightly upslope from the Norway stump.

Last week I visited the North Shore seaside site (where last year we revamped the drive court planting and added bamboo and holly for property line screening; to read about those projects, see Refinement and Air Spade In Action) and saw the spatial effect of losing this tree.

Surprisingly, the loss wasn’t as bad as I had thought it would be. The tree’s canopy had taken up a huge amount of space and cast deep shade over quite an area. It had screened my clients from an unappealing view of the corner of their neighbor’s house — but also from a wider view of the Boston skyline in the distance. Now the horizon is wider; they’re going to have a spectacular view of the city’s July 4 fireworks. While the neighbor’s house is unfortunately visible for the moment, the honey locust will mitigate that view. A younger specimen maple just over the property line, which had been hidden by the larger tree, looks healthy, and helps provide a perspective-focusing foreground to the far horizon.

Fortunately too, while the tree provided shade over a wide area of the site, much of its underplanting consisted of junipers and taxus, which should benefit from having more sunlight. The redtwig dogwood, azaleas, and hydrangea will think a bit about how much they like being exposed, but I think they’ll adapt. Even the little spring shade garden should fare all right, protected as much of it by a dense shrub planting from full sun exposure. Many of the herbaceous plants in it are ephemeral anyway, showing up in early spring before any trees leaf out, and fading back as foliage emerges above them.

Shade cast by the now-gone Norway maple protected the little spring garden and its ligularia circle at the path's end.

Our biggest concern for this newly sunny area is the ligularia bed. This bed, banded with a circle of bluestone, makes the southern terminus of a sightline through the tiny spring garden. The ‘Britt Marie Crawford’ ligularia, with its chocolate-brown foliage and golden spikes of flowers, makes a ravishing dot at the bottom of the exclamation point. And it’s a shade lover.

Ligularia 'Britt Marie Crawford' in its circle bed.

It may not be at all happy to be getting sun all day every day. My hope is that it can handle it well enough for long enough to feel relief from the kinder, more dappled shade that the new honey locust will eventually cast.

This site has seen several mature trees come down since last year; neighbors next to the drive court removed a large maple and a lovely S-shaped pine, an ailing ash tree got taken out, and a graceful Russian olive specimen, some 20 feet tall, blew down in the same storm that took the big Norway maple.

Each subtraction has shifted the sun/shade proportions, and each will affect the growth and health of the surrounding area. This kind of change requires adaptation both by the plants and by the owners, and provides opportunities for new ways of seeing a familiar place.

Read Full Post »

I just wrote a post on Herbie, the champion American elm in Yarmouth, Maine, that was taken down last week after a life that spanned more than two centuries. The post, at Taking Place In The Trees, included several photos I took the day before Herbie came down. In his prime, Herbie was the largest American elm in New England — 110′ high, 120′ wide at the crown’s widest point, and 20′ in girth. When I saw him, more than half of his largest limbs had been removed, but the tree’s presence and majesty were unmistakable.

Herbie the American Elm, in his prime.


A field count of the rings on Herbie’s trunk indicated that the tree was at least 212 years old. This was a tree that largely defined the genius loci of its neighborhood. It filled the corner of a private yard and marked the intersection of two streets; it cast high shade over a wide and fortunate area.

It’s not difficult to extrapolate lessons from Herbie’s presence and longevity, lessons that might inform how landscape architects design and advocate for planting spaces. I can think of these lessons:

1. Plant trees! They provide cover, coolness, oxygen, and identifiability to a place.

2. Plan for the long term — aim to foster a tree’s growth for decades, not just for years.

3. Design for root space — bare-root transplanting of large trees shows us how trees benefit from space in which to grow, and how far from the trunk their roots need to grow to add crown growth. Push those developers, homeowners, and city agency officials to allocate more space for subgrade growth; it’ll pay off in happier, healthier trees, and broader shade canopies.

4. Remember how big trees want to get. Putting a large-scaled canopy tree in a slot of soil better used for skinny grasses won’t give you the tree you’re looking for; it’ll give you a tree that whimpers for a few years, declines, and then dies. Scale your trees to your site (aiming for as big a planting site as possible — see 2. and 3.)

5. Shoot for size. People love the giant, and are more apt to preserve and take what they love. A large tree builds its own constituency, which helps when you’re trying to keep nature from being overtaken by pavement. If you want people to engage with nature, give them something with which it’s easy to engage. (Keeping in mind 4.)

That’s for starters. What other lessons do you see in Herbie’s story?

Read Full Post »

I just got a rough cut today of the video, shot last summer, of the moving of a very large (about 14″ caliper, 30′ height) London Plane Tree in Wellesley, MA. It’s taken a while to edit several hours of footage down to a half an hour, but it’s about done, and in the next few weeks I hope to have added commentary. This video is from the project run by Matt Foti’s crew, aided by Mike Furgal, and it showcases the techniques used in air-tool transplanting. I hope to be able to preview the rough cut at New England Grows, and have the final version completed by the end of February; if there’s enough interest in the landscape architecture, architecture, or arboriculture communities I’ll sell copies. Stay tuned.

The first of five 12-14' caliper London Plane trees being excavated with air tools and transplanted bare root in August 2009.

Read Full Post »

This tree has never been bare-rooted, as far as I know (though who could say, at this point?) It lives at Elm Bank, Mass. Hort’s headquarters in Wellesley, MA, and I took these photos at last week’s air-tool workshop there.

Norway spruce at Elm Bank.

Norway spruce at Elm Bank.


  Somehow it seems that Morticia Addams should come drifting into the picture to perch on this fantastic bench, sweeping a murky gloom behind her.

Somehow it seems that Morticia Addams should come drifting into the picture to perch on this fantastic bench, sweeping a murky gloom behind her.


For those of you still clicking on this site to see air-tool transplant posts, check out Taking Place In The Trees (www.takingplaceinthetrees.net).

Read Full Post »

St. Paul's Church, Cambridge, MA

St. Paul's Church, Cambridge, MA

It’s not just Gothic architecture that makes a good foil for honey locusts. I’ve always been fond of the Romanesque St. Paul’s parking court designed by Burck Ryan Associates. When it empties of cars, it’s a pleasantly proportioned and detailed plaza space punctuated with honey locust trunks; when the cars arrive, it becomes a shady parking lot.

If only those traffic cones were set square and plumb, and made of granite…Regardless, the place operates pretty much the way it was intended to, and in the most Cambridge-compact way possible.

Read Full Post »

Here’s a quick post to alert readers to the Massachusetts Arborists Association Special Seminar and Demonstration on air tool use. A team of four arborists — Mike Furgal, Matt Foti, Rolf Briggs, and Dave Leonard — will be showing how compressed-air tools can be used in arboricultural work (root forensics, bare-root planting, bare-root transplanting, shrub moving, etc.), and will discuss the advancements that this technology provide those working with or using woody plants in the landscape.

The seminar will be on September 10 at Elm Bank, the Massachusetts Horticultural Society’s property in Wellesley, MA — check the MAA link above for registration information. Registration is not limited to arborists, so interested landscape architects and contractors can go and see this work. I highly recommend signing up; last year’s seminar at Matt Foti’s farm, where Mike Furgal debuted the air-tool transplanting method, was really outstanding, and this year there’s bound to be even more information available and a great deal of informed and informative discussion.

One point: Bare-root transplanting, either with an air-tool or by root-washing, may never replace other methods of transplanting. But for specimen tree transplanting, where the value of an existing tree merits the effort involved, it is currently the gold standard. The number of roots retained with bare-root transplanting prevents the tremendous stress caused by other methods, and should be considered a valuable tool in the kit available to landscape architects, arborists, and contractors.

Bare-rooting allows for the moving of a tree this large in less than one day...

Bare-rooting allows for the moving of a tree this large in less than one day...


while preserving this much root mass.

while preserving this much root mass.

Read Full Post »

Matt Foti took these photos from last week’s big transplant project, and they illustrate some useful points.

Air-tool excavation is a very messy process, and it bears mentioning again that eye, ear, head, and face protection are really necessary.  Mike Furgal is wearing a face mask here; a respirator would give him even greater lung protection.  Blowing a good sandy loam is one thing; when pebbles and small rocks show up in the soil they become missiles, so long sleeves and pants should also be worn.

Air-tool excavation is a very messy process, and it bears mentioning again that eye, ear, head, and face protection are really necessary. Mike Furgal is wearing a face mask here; a respirator would give him even greater lung protection. Blowing a good sandy loam is one thing; when pebbles and small rocks show up in the soil they become missiles, so long sleeves and pants should also be worn.


Here is what a well-tied tree looks like in transit.  Note how the roots have been carefully pigtailed, and tiebacks to the tree's trunk are done neatly and professionally, to preserve the roots during excavation and in transit.

Here is what a well-tied tree looks like in transit. Note how the roots have been carefully pigtailed, and tiebacks to the tree's trunk are done neatly and professionally, to preserve the roots during excavation and in transit.


This project took place in late July, during a week of 85-degree heat.  Leaf turgor pressure was maintained throughout by the trees themselves (aided with some in-process watering).

This project took place in late July, during a week of 85-degree heat. Leaf turgor pressure was maintained throughout by the trees themselves (aided with some in-process watering).


Keeping the pigtails neat from the start makes unbundling and spreading the roots fairly easy.  The tree is now resting in the crater dug for its new home; the crew will unbundle and spread the roots out radially, pack soil underneath them to help level the tree, and backfill, water, and mulch the transplant.  Using a forklift allows the arborists to look under the root plate and gauge its bottom profile, which helps in shaping the floor of the planting crater.

Keeping the pigtails neat from the start makes unbundling and spreading the roots fairly easy. The tree is now resting in the crater dug for its new home; the crew will unbundle and spread the roots out radially, pack soil underneath them to help level the tree, and backfill, water, and mulch the transplant. Using a forklift allows the arborists to look under the root plate and gauge its bottom profile, which helps in shaping the floor of the planting crater.

Read Full Post »

Older Posts »